Click Tracker
Click Tracker is a click track designer or programmable metronome, made for composers, instrumentalists and conductors working with modern music.
-
Price/Donations
Download
Users/Testimonials
Click Tracker Library
Development
License
Tutorial
Score Structure Display
Midi Export
Feature List
Advanced Features
Software by João Pais
Click Tracker
Click Tracker is a program designed for composers, conductors and instrumentalists working with modern music. The main goal of the software is to prepare a click track of a score, even when great complexity is involved. It can also be used as a programmable metronome.
This software runs in Windows, macOS and Linux, and can be used either by conductors in concert, by musicians for practice purposes, or by composers while composing.
To prepare a score, just input the values in a plain text file format (.txt) according to the syntax explained in the tutorial online, or sent with the program.
Price / Donations
In order to make its development possible, a one-time donation is suggested. For professional musicians I would suggest 50 EUR, for students 25 EUR – of course, you can donate more or less than that. Keep in mind that if you use this program regularly, it will save much rehearsal and learning time. And also, for the program to reach this stage of development, many hours of work were invested into it.
Donations can be easily made through PAYPAL. Bank transfers to a german account are also possible (contact me for details).
An invoice can be written for donations.
Former sponsors
These versions were launched with the financial support of the following ensembles or individuals:
- Version 1.3 – Ensemble asamisimasa
- Version 1.4 – Carl Ludwig Hübsch
- Version 1.8 – Jeff Gavett
- Version 2.1 – Ensemble asamisimasa
- Version 2.2 – Stefan Prins
- Version 2.4 – Quatuor Bozzini
Download
The Click Tracker comes in four flavours:Click Tracker Android App
Check the app website or the Google play store for it.Click Tracker Desktop Application
Use this version in your computer if you don't want to install any extra software, such as Pure Data or Max/MSP.
You can download it for Windows or Apple.
Warning for Apple users
Due to Apple's recent security settings, you'll need to allow the Pure Data and other externals to run on your system, as indicated in this, and this and this picture.Additionaly, on ARM (M1, M2, etc.) processors you will have to run the program through Rosetta.
Click Tracker Patch for Pure Data
Use this version if you want to run the Click Tracker on Pure Data (which can be downloaded from here).As with the Desktop version, Apple users with M1 processors will have to run Pure Data through Rosetta and allow the necessary security settings.
Click Tracker Patch for Max/MSP
Use this version if you want to run the Click Tracker on Max/MSP (from version 7) on Windows or Apple (see above for security settings in Apple hardware).If you download any of the patch versions, see the Advanced Features section below on how to integrate it into your patches. The patch runs at a sampling rate of 44100Hz.
Users and testimonials
The Click Tracker is used by instrumentalists, conductors and composers such as: Anna D'Errico, Carl Ludwig Hübsch, Carola Bauckholt, Haakon Stene, Matteo Cesari, Pavlos Antoniadis, Stefan Prins, Jack Quartet, and the ensembles asamisimasa, Nadar, Interface, loadbang and Schlagquartett Köln.
This is what some users have to say about the software:
The Click Tracker is an essential tool for the new generation of musicians. It allows the cautious interpreter to master the intricacy of time structures at ease.
As an interpreter of new music, I am sometimes faced with challenges that deal with extremely complex tempo relations. Some of the foremost composers of our time, like Brian Ferneyhough, Enno Poppe and others, have been incorporating this challenge as a powerful expressive means in their aesthetics. I have been using the Click Tracker in order to refine my performance in works that require this kind of virtuosity.
I would definitely recommend it: its friendly and simple interface allows a performer to set up by himself/herself immediate support tools for challenges that are nothing but "friendly and simple"!
Excellent tool for learning and performing regardless of score complexity. Very easy to learn itself!
With the Click Tracker João Pais offers a highly flexible and long-awaited tool for musicians who require a metronome that meets the multiple work specific demands of contemporary music: combining complex metrical structures, customized sub-divisions, tempo changes, as well as a wide range of other features, all easily and quickly programmed. The Click Tracker fills in the gap between standard mechanical metronome functions and a conductor's flexibility, and is useful in rehearsal as well as in performance.
As the director of the vocal ensemble Ekmeles and artistic director of ensemble loadbang I am constantly leading rehearsals on new and difficult music. For scores with complex metric and tempo changes, Click Tracker allows for the kind of focused work on rhythm which would be impossible with a traditional metronome. Making click tracks is extraordinarily easy and intuitive, even for the most complicated scores.
The Click Tracker is extremely easy to use, in 30 minutes you can grasp the nuts and bolts and are able to make a click track! I have used it multiple times, both for rehearsals (the rehearsal mode, starting at whatever measure, and giving the option to change the tempo when necessary is super convenient) and for making click tracks for concerts.
Since I got to know João and this awesome program I haven't used anything else when dealing with click tracks!
Click Tracker Library
A public library of Click Tracker files is being built – you can find it here. You can download any tracks that were submitted to it, or also find out how you can support the library yourself.
Further development and feature commissioning
I'm searching for any support that would allow me to dedicate time to make this program more complete. This includes not just improvements in the existing possibilities, but also new techniques of input, control and performance, which will make it an even better learning, performance and composition tool. You can consult the list of current and planned features.
If you know any institution / ensemble / individual that could be interested in supporting the further development of this program – or in comissioning any specific features – please contact me. Or if you want me to program a specific feature with your ideas, ask me for a quote.
Every individual or group contributing to the development of this program will be mentioned in future versions (see "Former sponsors" above).
License and distribution

Click Tracker by João Pais is licensed under a Creative Commons Attribution-NonCommercial-NoDerivatives 4.0 International License. Based on a work at puredata.info.
If you wish to use this software in any way not allowed by this license, or to do commercial work, please contact the author.
Tutorial
This tutorial shows how to prepare a score for the Click Tracker patch, including all its features.
The Click Tracker reads documents in text format (.txt). They must be saved as text-only – in case you use Word or any other office software you should pay attention to this.
I suggest using a programme such as Notepad++ for Windows or SimpleText for Apple to edit your track files. See below for other resources for these programs.
To reproduce a piece with the Click Tracker you must transcribe the score you want to hear to the format readable by this program – basically you must write down the metrical structure of the score.
The score below comes with the program, you can find it under examples/_score-tutorial.txt.
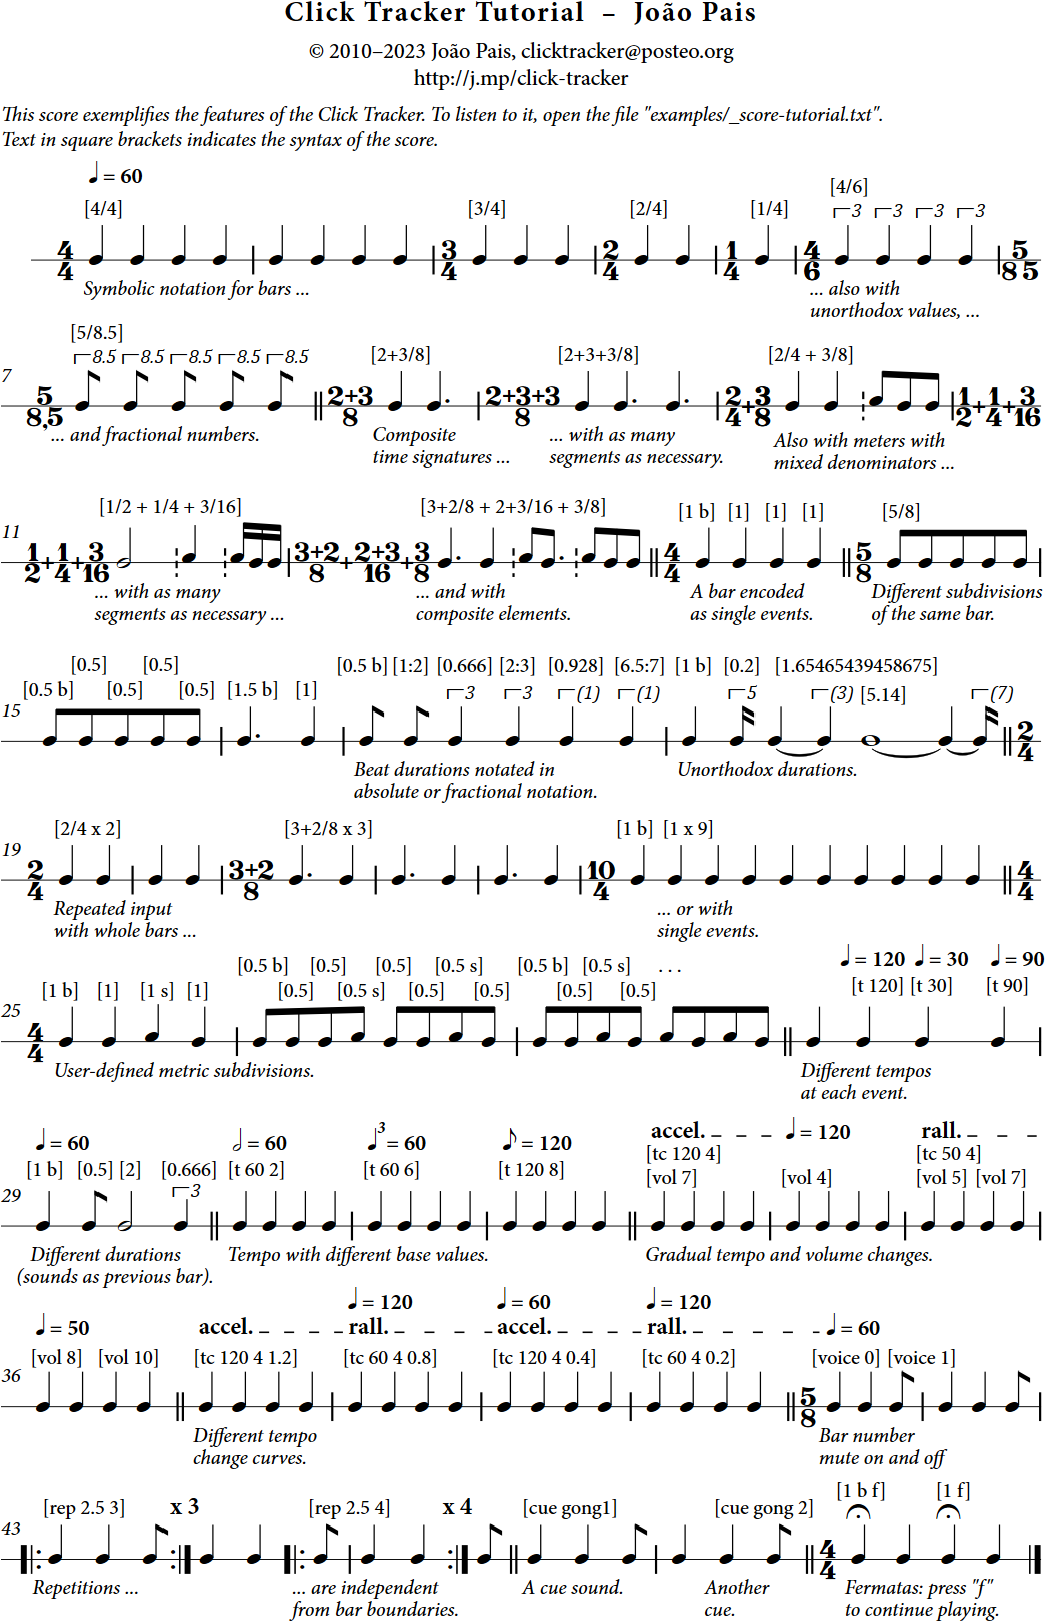
ADDING TEMPO / BARS
You start the score by writing a tempo with the command "t 60" (with space in between) for MM=60 – in case you forget to say which tempo you want the program will assume that the piece is at MM60.
A regular bar can be added with the command x/y – like a normal bar. For example with only a couple lines we can create a simple bar sequence. Bars 2-5 go from 4/4 to 1/4:
t 60
4/4
4/4
3/4
2/4
1/4
But you can use any ratio you want to: for the x/y format, it's only important that the numerator is a whole number (no decimal numbers allowed). On the other hand the denominator can be decimal if you want to. For example bars 6-7:
4/6
5/8.5
COMPOSITE TIME SIGNATURES
You can add composite time signatures using the syntax x+y/z. You can use as many segments as necessary:2+3/8
2+3+3/8
2/4 + 3/8
1/2 + 1/4 + 3/16
3+2/8 + 2+3/16 + 3/8
ADDING BEATS
To notate events in higher detail, you can define the duration of each beat in one line – for example 1 for a full beat. There are 2 possible parameters: the beat duration and the letter "b" (separated by a space) to mark the beginning of a bar.For example here is a 4/4 bar:
1 b
1
1
1

The same result is attained with both x/y syntax or with discrete events. These two 5/8 bars are written out differently, but sound the same:
5/8
.5 b
.5
.5
.5
.5
If you need a bar with irregular divisions, you'll need to define different durations (similar to bar 8):
1.5 b
1
Also the y number always understands the 4th-note to be the standard duration. In case you're writing a score where another value is the base value for the tempo (for example 8th-note or minim) then you must do some math to get the proportions right. Always think of the beats as individual durations one after the other.
Notice that all decimal values must be written with a dot instead of a comma.
There is another way to notate factional values – through the fraction that calculates the value. You can use any values on both sides of the fraction. Here follow some values notated in both ways:
0.5 b
1:2
0.666
2:3
0.928
6.5:7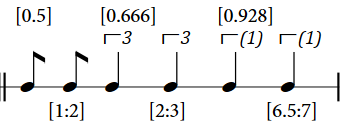
And now something completely different: a completely irregular bar with some irrational values.
1 b
.2
1.65465439458675
5.14
REPEATED INPUT
You can input a repeated event by adding the command " x Y" to it. For example to type in several bars in one line, instead of several lines, each with one bar:
2/4 x 2
3+2/8 x 3
This also applies to single events:
1 b
1 x 9
The Y value must be a whole number starting from 1. It should only be used with events that generate beats.
USER-DEFINED METRIC SUBDIVISIONS
With the letter "s" after an event, you can make a third type of metric subdivision sound, between the pitches of the first and other beats in the bar. Use it as you use the "b" letter; this must come always after the first event in a bar.
1 b
1
1 s
1

.5 b
.5
.5
.5 s
.5
.5
.5 s
.5

.5 b
.5
.5 s
.5
.5 s
.5
.5 s
.5
You might notice that a beat with a subdivision have an extra "s" in the beat number GUI. Also, see below in the GUI Control and Command List sections how to use the "subdiv" command or the GUI to switch the playback of subdivisions on/off.
CHANGING TEMPI
You can use the t command anywhere in the piece and how many times you want – just put it before the note you want it to apply for. For example here is a bar where the tempo changes on each note:
t 60
1 b
t 120
1
t 30
1
t 90
1
If your time signature is irregular you can change the duration of each beat – including with decimal values. The next bar sounds just like the previous one but in the same tempo throughout:
t 60
1 b
.5
2
.666
There are no limits to the decimal values you can use.
TEMPO WITH A DIFFERENT BASE VALUE
As mentioned above, a number indicates a tempo based on a quarter note. To use another duration as the base value for the tempo, input it after the tempo. This duration is expressed in the same way as the denominator in a time signature.
t 60 2
4/4
t 60 6
4/4
t 120 8
Notice that the tempo display indicator will be converted to the quarter note value in both main window and score display.
GRADUAL TEMPO CHANGES and VOLUME CHANGES
To change the tempo suddenly you already saw the t command. But to create gradual tempo changes – accelerandi and ritardandi – you can use the command "tc x y z":
- x is the new tempo
- y the number of beats necessary to reach it. The beat duration of the tempo change MUST coincide with the sum of the beats it lasts: for example, if it lasts 1+1+0.75 beats, the result is 2.75.
- z is facultative - it indicates de curvature of the tempo change. Values between 0 and 2 should be enough for your use, and if no value is indicated, the default values are 0.5 for ritardandi and 0.8 for accelerandi. See below in Score Structure Display more details on experimenting with the values.
Here is an accelerando with 1 bar duration and one bar in the new tempo. At the same time the volume goes slightly down.
tc 120 4
vol 7
4/4
and now we're in the new tempo. The volume goes lower.
vol 4
4/4
And now it slows down to slower as the initial tempo. The volume goes up slowly until it gets back to the maximum.
tc 50 4
vol 5
1 b
1
vol 7
1
1
and now is at MM50.
vol 8
1 b
1
vol 10
1
1
The next four bars use the third argument to change the curve of each tempo change:

If you see the score, you will notice that the result is different each time:

You can also use the x:y syntax for the duration of the command, as in "tc 60 2:3".
BAR NUMBER MUTE
If some bars are too fast to hear, the voice saying the numbers can be muted with the command "voice 0", or unmuted with "voice 1". Here is a new irregular bar back at MM60 with both commands, which means the bar number won't be heard:
t 60
voice 0
1 b
1
voice 1
.5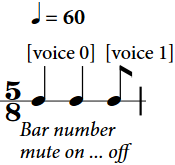
REPETITIONS
Repetitions of the same bar can be used a lot in modern music. In case you want to repeat a fragment just use the command "rep x y" where x is the number of beats you want to repeat and y the number of times. Put this command just before the first beat of the passage to be repeated. Again – x MUST coincide with the actual sum of beats (you can't use 1 as a value for y). The number of the current repetition will be shown in the screen.
In case you use the "Go to bar" feature (more about that later) to start in the middle of a repetition sequence it won't work. For a repetition sequence to be correctly performed you must play the first note (since the command is before it).
1 b
1
.5
And now the same bar repeated 3 times:
rep 2.5 3
1 b
1
.5
You can also do the repetitions across the barlines. We stay in the same time signature but dislocate the repetition point:
1 b
1
rep 2.5 4
.5
1 b
1
.5
CUES
Cues (see below) can be added using the syntax "cue x" – where x is the filename.
cue gong1
1 b
1
.5
Place the cue before any beat you want to mark. See further details below.
1 b
cue gong 2
1
.5
FERMATAS
Fermatas can be added with the letter "f" after a single beat, separated by a space:
1 b f
1
1 f
1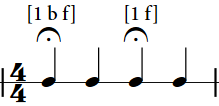
If the fermata playback mode is on (check the Settings window), notes with fermatas will hold until the key "f" is pressed, and the main display will change from "Playing" to "Fermata". You can use the command "fermata x" to define in your score if fermata mode should be on or off.
PICKUP BAR
In a performance you can't start the click track without warning – with the "pickup x" comand it is possible to repeat the first bar as many times as you need in order for the musicians to prepare themselves. The parameter x defines how many times the bar will be repeated.
You can either include this command in the score file (anywhere in the score but I suggest you to leave it on top) – or change it anytime in the patch itself. To have 1 pickup bar write "pickup 1".
As pickup bars aren't exactly repetitions and you must know exactly when the piece is going to start the bar numbers in pickup bars work downwards until they get to 1 – which is point where the score begins. In case you have 1 pickup bar you'll and your chosen output has voice included you'll hear bar "2 [beats] 1". If you have 2 pickup bars then "3 [beats] 2 [beats] 1".
OTHER FIRST BAR NUMBER
With the comand "first x" you can define the number of the first bar to be played – in case your click track doesn't begin at bar 1.
BEAT COUNTING DIRECTION
(Settings window)With the command "direction up" or "direction down" you can define if the beats inside a bar are counted upwards or downwards. If no command is used the standard value is "up". This can be set anytime in the patch using the button "beat.dir".
BAR FILTER
(Settings window)Use the buttons under "Bar Filter" to define how many bars are spoken: all / every 5 bars / every 10 bars. This can be helpful in very dense tracks.
You can also define the setting in your score using the command "bar-filt x" and the number 0 / 1 / 2 for the settings mentioned above:
bar-filt 0Setting channel and device output
The output channels are set by default to 1 and 2. To change this setting use the command "audiooutput $1 $2 ..." in your score file. The parameters are the output channels from 1 to 32 – you can add as many as necessary.
audiooutput 1 3 6 12Desktop Application – In the Settings window, press "Audio Settings" to open the Audio Status window. There you can set your output devices and channels.
Max Patch – Follow the same instructions as in the Desktop Application, or open the Audio Status window directly from the Max menu.
Pure Data Patch – In the Settings window, Output Channels you can use the matrix. Set your audio device in Pure Data's Audio Settings.
CUES
You can prepare your own audio cues to be added to the click track. These must follow the following conventions:
- store them in the same folder as the score file – see the examples folder.
- format them as mono / wav / 16b / 44.1KHz
- use the same name to add them to the score: "cue gong1" / "cue gong 2" / etc.
DEFINITION OF PLAYBACK PARAMETERS
You can adjust the playback parameters click format and language anytime while working with the patch. But you can also adjust them in the score file. Then you don't need to always reset your patch when you load a new score (assuming each score has a different setting). To set a parameter you just write the command "par [parameters]" anywhere in the score. But like with the pickup command I advise you to put these general remarks in the beginning. Note: if you write down more than one command for the same parameter then the last command is the one to be valid.
The available parameters are:
click format – click / voice + click = cl clst
language – english / german / spanish /portuguese = english deutsch espanol portugues
For example to have a click track performed with clicks you write
par clTo have a score performed with click and voice in portuguese you write
par clst portuguesThe standard format is voice + click / english. Since there were some other commands before let's set it back to the standard preset.
par clst englishGUI CONTROL
The Click Tracker's GUI offers the following possibilities (keyboard shortcuts are between [ ] ):Play / Stop [Space] – Self-explanatory.
Continue playing [p] – Plays from the beginning of the bar where playback stopped the last time.
Open score / reload score – Open a score file or reload one (in case the file was edited). In the application or in the Max patch a file can also be dropped over the window.
Export WAV – Exports an audio file of the score, according to the current playback settings.
Export MIDI – Exports a midi file of the score (see below for more details).
Export TXT – Exports a txt file of the score, adding "-new" to the filename. Use it if you reshape tempo changes in the score structure display.
Export SVG – Exports an svg graphic of the score, as seen in the score structure display.
Audio – Choose click track audio.
Language – Choose language.
Instructions – Opens window with short reference.
Bar / Beat / Dur / Rep – Bar and Beat count / Duration of current beat / Repetition indication.
Bars – How many bars are in the score.
Duration – Duration of the excerpt you just played.
Cue – Active cue.
Track Volume – Volume as defined in the score.
For the next commands in light blue boxes: you can change the values by either click and dragging with the mouse and by click or pressing the shortcut key and typing the value in the keyboard, then press return.
Go to Bar [g] – Start directly from a bar. The button near it resets the value [shift+g].
Pickup Bar [u] – Setup the number of pickup bars. The button near it resets the value [shift+u].
Tempo Scaler [t] – If a piece is too fast or slow for you to follow you can just change the scaling factor in the interface. Both original and scaled tempi are shown. The button near it resets the value [shift+u].
Loop [l] – Loops from current bar to the bar indicated in "Loop to". The button near it turns it on/off [shift+l].
Output volume meter and Volume level – Self explanatory.
In the Settings window:
Bar Filter – How many bars are spoken.
First Beat – Mute other beats besides the first one in each bar.
Beat Direction – Changes beat counting direction up or downwards
Subdivision – Turns playback of metric subdivisions on/off.
Fermata – Turns playback of fermatas on/off. Display – Shows large window with beat and bar numbers. Keyboard Control – Turn keyboard control on/off.
Output Channels – Select the output channels.
OSC – Settings for OSC communication.
COMMAND LIST
These commands can be used in your score files:
t $1 – Tempo in MM – E.g. t 70[beat duration] b – b marks the beginning of a bar
[beat duration] – duration of a beat
[beat duration] s – s marks a metric subdivision
$1:$2 – fractional notation for the duration of beats – E.g. 2:3
$1/$2 – abreviated input of regular bars – E.g. 3/4
$1+$2/$3 – abreviated input of composite bars – E.g. 2+3/8
$1/$2 + $3/$4 – abreviated input of composite bars with different denominators – E.g. 2/4 + 3/8
[command] x $1 – repeated input – E.g. 3/4 x 3
tc $1 $2 $3 – tempo change. $1 = new tempo / $2 = number of beats necessary to reach it (beat duration of the tempo change MUST coincide with the sum of the beats it lasts) / $3 = curvature. – E.g. tc 120 5 1.2
rep $1 $2 – repetition of a fragment. $1 = number of beats to repeat / $2 = number of times to repeat – E.g. rep 4 3
cue $1 – play audio cue $1.wav – E.g. cue gong1
first $1 – number of the first bar of the score – E.g. first 35
fermata 0/1 – Turns fermata playback on/off – E.g. fermata 1
pickup $1 – pickup bar repeats the first bar $1 times (bar numbers decrease from $1+1 to 1) – E.g. pickup 2
subdiv 0/1 – Turns playback of metric subdivisions on/off. – E.g. subdiv 1
voice 0/1 – Turns bar number mute on/off – E.g. voice 1
vol $1 – volume between 0 and 10 – E.g. vol 8
par cl/clst english/deutsch/espanol/portugues – playback parameters
direction up/down – changes beat counting direction up or downwards. Default is upwards.
audiooutput $1 $2 ... – set output channels from 1 to 32
osc port $1 – set receiving port
osc sendip $1 – set send IP
osc sendpo $1 – set send port
KEYBOARD SHORTCUTS
space – play/stop
p – play from last active bar
Esc – turn keyboard control on/off
g – select Go to Bar for input
shift+g – reset Go to Bar
u – select Pickup Bar for input
shift+u – reset Pickup Bar
t – select Tempo Scaler for input
shift+t – reset Tempo Scaler
l – select Loop to for input
shift+l – turn Loop to on/off
Score Structure Display
When clicking in the "Score" button you can see a time-scaled display of the events in the current file (this feature will not be available on mobile plattforms). These are arranged according to the following structure:
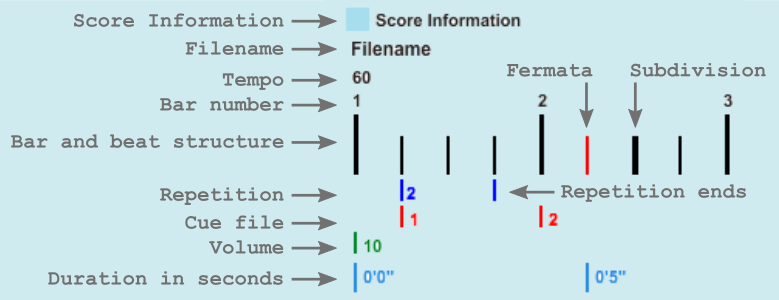
- Score information - Open window to show event data (see below)
- Filename - Filename of opened score
- Tempo - Tempo of event (based on quarter note)
- Bar number
- Bar and beat structure:
- Long, thick lines indicate first beat in bar.
- Smaller lines indicate other beats. If thicker, it indicates a metric subdivision.
- Distance between lines indicates duration, adjusted for length.
- Beats with fermatas are colored red.
- Repetition:
- Shows repetition starting point and number.
- A blue line with no number shows the end of the last repetition.
- Cue sound - shows cue sounds
- Volume
- Duration in seconds
In the score information window you can retrieve information on concrete events.
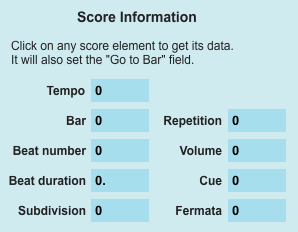
When an event is clicked, the information is read in this window, and sets up the Go to Bar field.
Changing the shape of tempo changes in the score display
You can change the shape of the tempo change curve by following these steps:
- Find the tc command you wish to change and move the slider.
Moving it to the left will decrease the overall time, moving it to the right will increase it.

- The score will be redrawn, you can listen to the new version and keep changing it.
- When finished, export the file as txt. It will create a new file with the ending "-new" after the filename. Due to the internal processing, some details might be changed.
MIDI Export
Exported MIDI files are formated in this way:
- Pitch 72 (C5) plays the first beat in the bar.
- Pitch 60 (C4) plays the other beats in the bar.
- Pitch 67 (G4) plays the beats with subdivisions in the bar.
- A tag is added to each bar with the current time, repetition indicator ("bar number"."repetition number"), and the text "bar X".
There are certain limitations:
- bars with uncommon time signature denominators can't be converted yet (e.g. 4/6, etc.)
- bars with beats whose duration doesn't fit a rational time signature won't be converted (e.g. a duration of 1:3)
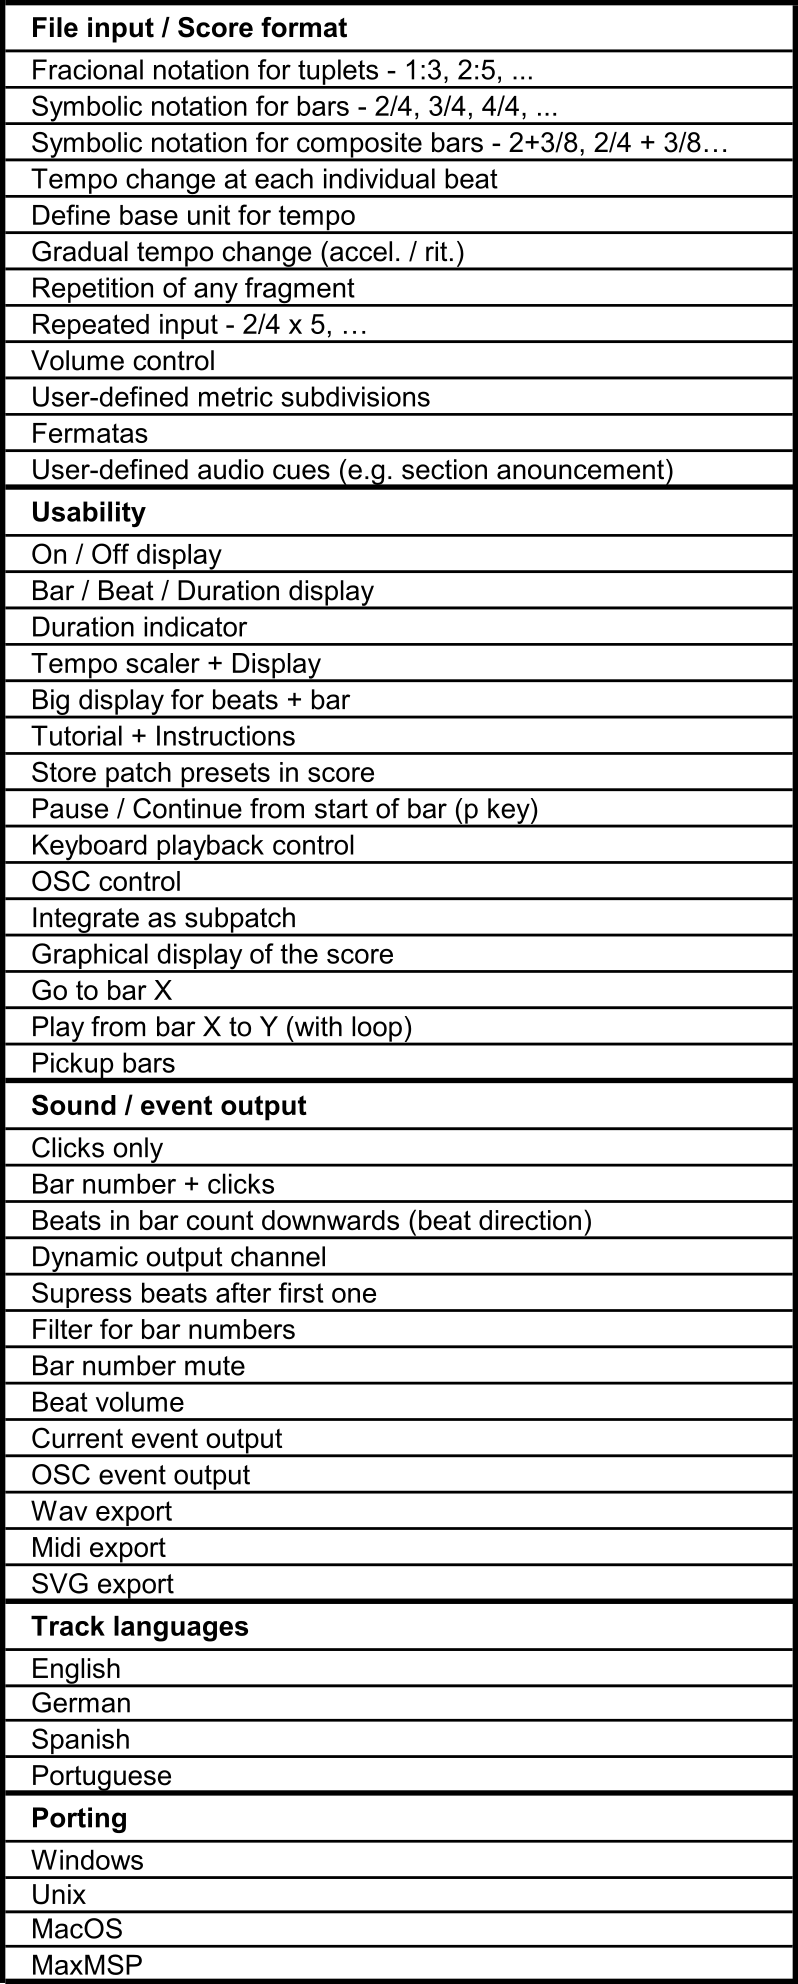
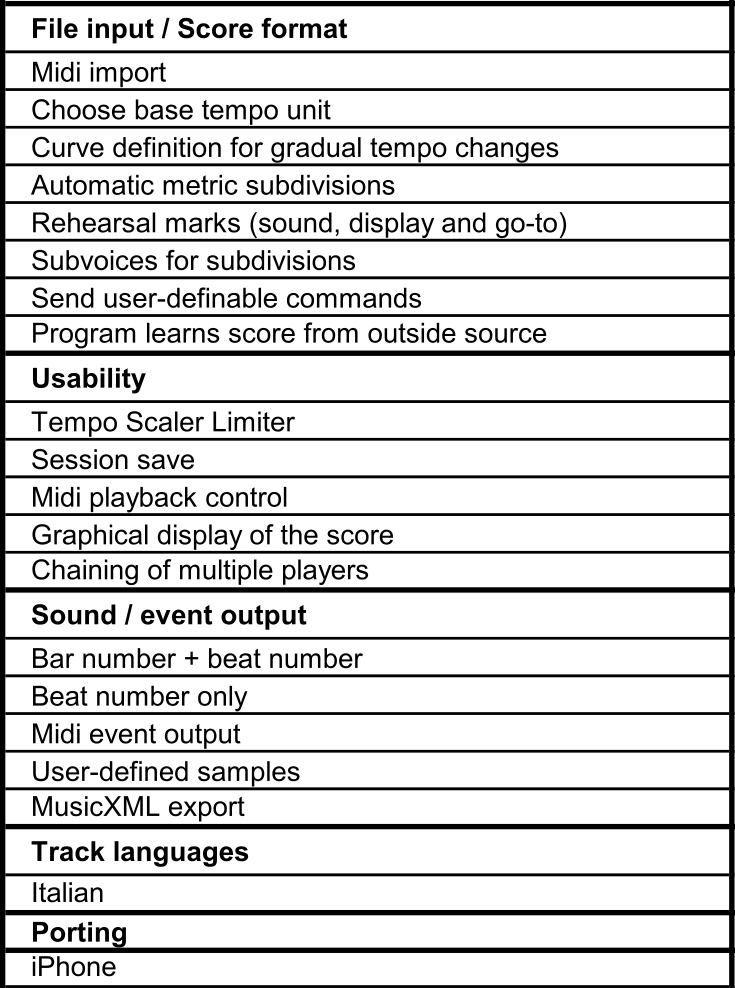
Feature list
Here are the current list of programmed features and features to program. If any of these interest you, you can commission them – or any other suggestions you might have.
Programmed features
Features to program
Advanced Features
These features are designed for Pure Data and Max/MSP programmers. You can find an example patch with the following features in examples/tutorial-subpatch-osc.pd or in Click-Tracker.maxhelp.Click Tracker as subpatch
The Click Tracker can be used as a subpatch of another Pure Data or Max/MSP patches - it has one inlet for control messages and two outlets for sound and messages.
It is useful if you add the line "subpatch" to your score: this will turn off the keyboard control, and route the sound output out of the main dac to the left outlet.
OSC Controls
Click on OSC to open the OSC settings window. There you can set:
- Receive port - the receive port of the Click Tracker patch. The default port is 5625.
- Send Adress / Port - IP Adress and Port where the Click Tracker is sending to. The default value is 127.0.0.1. You must activate the "connect OSC" button.
- Debug messages on/off - turn on to see any error messages from false OSC commands. The default port is 5626.
OSC Setup in the score file
You can setup the OSC parameters in your score. For that, use the following commands:- osc port $1 - set receiving port
- osc sendip $1 - set send IP
- osc sendport $1 - set send port
OSC Variables
See the files examples/tutorial-subpatch-osc.pd (for Pure data) and Click-Tracker.maxhelp (for Max/MSP) for examples on all the possible variables and their arguments.
Inputting a score with syntax highlighting
If you use Notepad++ for Windows, you can install an extension to allow for syntax highligting, making your work even easier. Comments will be colored green, commands in blue, and letters after beat durations ("b", "s", "f") in red: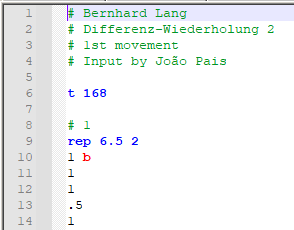
For that, follow these steps:
- Download the click-tracker.udl.xml file.
- In Notepad++ go to Language/User Defined Language/Open User Defined Language Folder.
- Move the click-tracker.udl file to that folder.
- Restart Notepad++. When you open a Click Tracker score, go to Language/Click Tracker to activate the highlighting.
For more informations/requests contact me.
© João Pais 03.10.2024